Thursday, May 7, 2009

Handpainted Scarves - Easy Mother's Day Project #2

Here is another quick and easy Mother's Day project your kids can whip together.........hand painted scarves...I absolutely love these and they are incredibly easy. This was the project I did with Grade 3. So any grade 3 Moms out there avert your eyes.
You need some lightweight material like organza, silk, lining material....I got ours at Walmart for about $4.00 a meter. White works well so your colors stay true when you paint on it but you could also use a cream or beige.
You then need to cut scarf lengths...easiest way to do this is to measure about 14 inches or 33cm and then cut from the fold all the way to the salvage ends. This way you only have to hem the sides and you can maximize the # of scarves you get. I used 7 metres to get 21 scarves.
Now you can hem your sides at this point...I ran out of time on Sunday night so I had the kids paint first and then I hemmed them after.
Take regular acrylic craft paint...you don't need to buy fancy dyes or fabric paint and water it down to an inky consistency.
Lay your scarf down on top of wax paper. I had the kids working on long tables..we put down long pieces of wax paper on top our our Art vinyl tablecloths...we could get 2 to a table.
Paint on your design..the paints will run a bit together but that is the beauty of this technique..you get a soft watercolor effect. Try to choose colors that compliment each other..no black or really dark colors.
I then hung the scarves from a clothesline which had a tablecloth laid out underneath to pick up drips...peel off the wax paper and let the scarf dry...it will only take a few minutes.
When the scarf is fully dry wash in the washing machine with a bit of detergent and fabric softener. The colors will fade only slightly and you will lose the stiffness from the paint...it will also get rid of that paint smell.
Give one to your Mom or Grandma...and make a few for yourself!
The kids got lots of positive comments from other teachers and visiting Moms as they were working on these..I think they will be a hit.
Give it a go and we will see you next time.
HAPPY MOTHER"S DAY !!
gail

Tuesday, May 5, 2009

Easy Mother's Day Project-Painted Pots


Here is a really easy Mother's Day art project. I am doing this with Kindergarten this year as we are pressed for time with all the Opera rehearsals.


MATERIALS REQUIRED:

4 inch peat pots, I got mine at a local nursery...they cost 20 cents a piece
white acrylic paint or gesso
tempera paints
paintbrush
flowers
soil


I absolutely love these peat pots from a crafting point of view...I can paint them, decoupage them, color on them (pastels work really well), collage them....you name it. I always try to stock up on them...add a handle and they make great baskets for gift giving etc.

From a gardening view they can be challenging to keep moist and when you plant them directly into the ground you lose your art work so I put a plastic pot inside them to hold the flower.


You need to prime your pots first. I use gesso which is a thick white acrylic paint...you can use plain white acrylic craft paint as well.


Cover the entire pot and leave to dry.


Using tempera paints paint your pot whatever way you wish...for the kindergartners I did not let them use black or brown because the pots end up just black and brown......(they tend to overmix colors and we end up with mud).

Let the pots dry and then plant...if you want to have the pot as a keepsake use a 4 inch plastic pot as a liner. We added a ladybug glued to a popsicle stick and Ta Da...easy Mother's Day Gift.


Have fun!


see you next time

gail

Saturday, May 2, 2009

Children's Day - Koinobori Windsocks

May 5th is Kodomo no Hi or Children's Day in Japan.


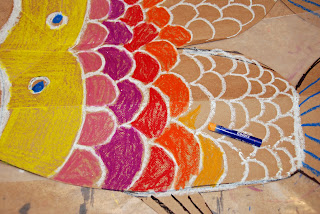
These Koinobori or flying carp windsocks are a great way to celebrate. I have 2 tutorials to share... the fabric version with the glue batik and a bit of sewing and a easier version using paper and pastel resist.

So let's get started


Fabric Version

MATERIALS REQUIRED:

some lightweight fabric, cotton works well
Elmer's gel glue
acrylic craft paint
paintbrush
sewing machine
12-14" length of wire
pole...we used a natural bamboo garden stake
fishing line
fishing swivel (optional)


I had the kids draw out their design first on paper. Because we are making a fish with 2 sides but folding it in half it's good to get them to practice how it is laid out.


Cut a piece of fabric approximately 24 inches long and 16 inches wide. Lay flat on top of some wax paper. We also have ours on top of an art board so I can move it easily.


Using Elmer's blue gel glue recreate your fish design on the fabric.


This glue works the best when doing this glue batik technique. It is the no run gel formula. I find the glitter version hard for the kids to squeeze and the clear version will run messing up your design.


We did half of ours using the glitter glue so you could see our design in the picture.


Put aside and let dry overnight.


Using watered down acrylic craft paint..put some color on to your fish.


Set aside to dry.


When dry soak in some hot water in a sink or bathtub...after about 20 minutes the glue will have softened and dissolved. You may have to lightly scrub or agitate it to remove the glue.
Let dry.


Fold over about 2 inches at the mouth of the fish and sew the width of the fish creating a pocket for our wire.


Insert the wire at this time.


Bring the ends together forming a circle for our gaping fish mouth. Twist the ends on top of each other... you may have to use some pliers.


Your fish mouth should look like this.


With right sides facing sew a seam the length of the body..sew up the tail leaving a small gap it the center of the tail to allow some air to flow thru your wind sock.


Here is the gap. Cut away excess fabric from the seams. Turn the fish right side out.


Your windsock should look like this.


Attach a 16 inch piece of fishing line to each side of the mouth. I find the fishing line is stiff enough that you can just poke a hole thru the fabric with it.


Try to get the places where you are attaching the line to be even to one another.


Attach to pole. You can use a fishing swivel to prevent the windsock from getting tangled in the wind.


Paper version

MATERIALS REQUIRED:

heavy brown kraft paper..I used a paper bag
scissors
pastels
tempera paint
paintbrush
glue
string
pole


Take your paper or paper bag and cut a piece 16 inches wide by 20 inches long.


Fold in half.


Trace out a fish shape. Cut out shape keeping as much of the fold on the top of the fish as you can.


Open up flat and start coloring in your fish using pastels.


When finished carefully crumple up.

Open up flat and smooth out a bit. Taking some tempera paint, paint over top the pastel. It will resist the paint and cause it to bead up making it look like your fish is underwater.


Cover your fish completely.
Let dry.


Take 2 pipe cleaners and loosely twist together.


Run a bead along the inside of the mouth edge of the fish.


Roll the edge up enclosing the pipe cleaner.


You can use some clothespins to hold it into place until it dries.


Run a bead of glue along the outer edge of the fish. Leave a gap in the tail to let the air flow thru the windsock. Fold the fish over.


You can hold it into place with some clothespins until it dries.


Bend the wire into a circle to form a gaping mouth.


Poke a hole into both sides of the mouth to attach the string.


Attach to pole.


Here is our paper version.


Give it a try and have your own Children's Day parade.

see you next time
gail

Tuesday, April 28, 2009

Work on Sets Continues

Well the set painting continues. We have been hard at it for the last 2 days. Here is the Mansion set and the outside garden....
CLICK ON PICTURE TO SEE LARGER.


The Mansion scene has a part outside in the garden so you have to imagine a cut wall here...still have to fiddle with it to make it look right.


Here is the finished sets from last time.


All the sets were supposed to be done for Wednesday but like everything we need a bit more time.....hope to be done by end of Thursday as I'm off on a field trip with Kindergarten tomorrow. Then my life should get back to normal and I can post some great Mother's Day Projects I have been putting together...Thanks for your patience and thanks to my Mom volunteers for helping me out!
see you next time
gail