Wednesday, February 29, 2012

Mixed Media Skyline

So here is a project I'm doing with the Grade Ones....Mixed Media Skylines.


The buildings have different widths so we have some 3D interest going on.


MATERIALS REQUIRED:

- canvas or cardboard substrate (base)
- cardboard, chipboard, heavy corrugated cardboard, Styrofoam, or packing material
- Dry Dek or drywall compound (a huge bucket will only cost $20.00)
- wax paper
- household items for texturing, (combs, toothpicks, Lego, straws, etc.)
- acrylic craft paint
- paintbrushes
- assorted screws, washers, whatever excess hardware on hand
- colored paper, book pages, newspaper
- scissors
- Aleene's tacky glue
- moon clip art from "The Graphics Fairy"
- star sequins
- Mod Podge, acrylic medium, or sealer

PROCEDURE:
Cut some rectangles out of cardboard and chipboard.  If you don't have any packing material (I just happen to have some 2 inch wide corrugated cardboard) you can use Styrofoam, even boxes.  You can also glue several pieces together to make a thick piece.  For the Grade Ones I'll have this already cut into rectangles, triangles and semi circles.
Lay it out on top of your canvas or background so you know you have enough buildings.

Apply the drywall compound onto the cardboard.  Use a spatula from the hardware store (only 88 cents) or even an old gift card. Apply to just the front for the thin pieces and include the sides for the thicker pieces.  You can use some household items for texturing if you want.
You can stick in some washers now if you want or glue them on later after you have painted.  I did it both ways. Let dry about 6-8 hrs.
Paint your background with black acrylic paint and let dry.
Splatter on some white paint for stars.  With the kids I use a splatter box.
Paint the buildings with acrylic paint.  Let dry.  Glue on some windows with colored paper, book pages, or newspaper.
Glue the buildings onto the background.  Add the moon and a few sequin stars.
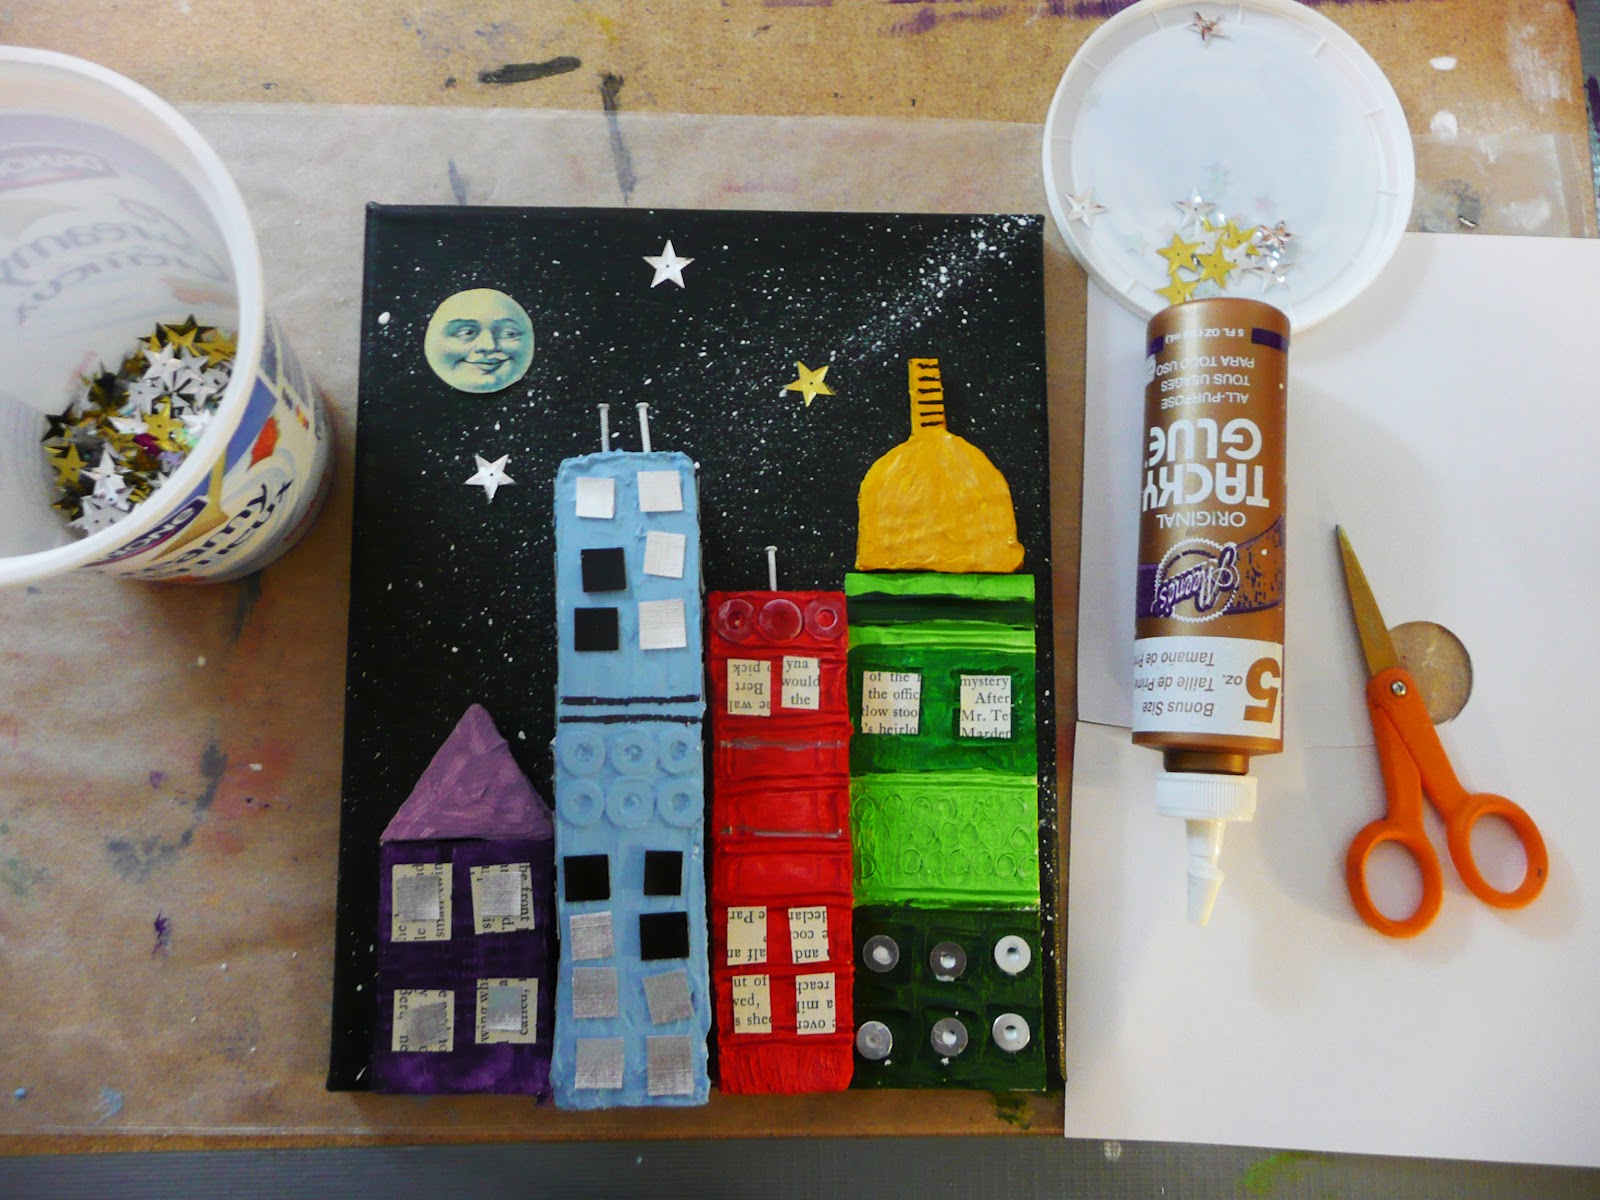
Finally add a coat of Mod Podge, acrylic medium, or your usual sealer for a nice shiny finish.
That's it.  What a wonderful project!
See you next time.

Sunday, February 26, 2012

How to Make a Rainbow Fish

I'm starting a new "artist in residence" program tomorrow.  I've been busy sourcing supplies, making samples, PowerPoint's, etc all while finishing off projects at my other school...whew!

One of the projects we will be doing is mixed media Rainbow Fish in Kindergarten.


March seems to be "Rainbow Fish" month for many Kinders out there.  It all starts by reading Marcus Pfister's book "The Rainbow Fish". 


MATERIALS REQUIRED:

- corrugated cardboard
- Dry Dek or drywall compound
- toothpick, spoon
- liquid tempera paint
- clear gems
- shell
- glitter glue
- sequins
- Aleene's Tacky glue
- black sharpie
- Mod Podge, optional

PROCEDURE:

I drew out a Rainbow Fish shape on corrugated cardboard and then used it as a template to trace out.....oh 40 more.

Cut out.


Have the kids spread Dry Dek or regular drywall compound over the cardboard.  It's kinda like icing a cookie.

You want enough to be able to add some texture.


Using a toothpick draw some lines in the tail and fins.


Then using a spoon you can make some scale depressions.  You can also just use your finger.  The compound is a bit sticky so you might need a tissue or 2.


Start at the tail and work your way back.  Leave some area plain for the face.

Let the drywall compound set, about 8 hrs. or so.

Meanwhile you can paint your shell, this is the special scale, silver.

You can then add some glitter glue to make it really sparkle.


When your fish is dry paint with liquid tempera.  Bright colors work best.


To make the fish eye I found these glass gems at the Dollar Store, you know the decorative ones for vases.

They have a flat side to them.

Trace around one and then add a black circle (pupil) with sharpie or marker.

Cut out and glue or tape to the bottom.  I used Mod Podge but any acrylic medium would also work.
Glue into place on the fish with tacky glue.

Glue the special scale (the shell) into place as well.


You can add lips at this time as well with marker or sharpie.


Paint in for some color.


You can then add a few large sequins for some extra sparkle.  You know those Kinders, gotta have some bling.


Finally you can seal the whole thing with some Mod Podge for a nice glossy finish and you're done.


To hang on the bulletin board attach a wire loop to the back with some duct tape and then hang with push pins or thumbtacks.


That's it.

Some other fishy projects you might want to try:


FISH PRINTS


PAINTED FISH


CLAY FISH LIGHTS


See you soon.


Sunday, February 19, 2012

In the Style of Picasso: Portraits

METHOD 1

Picasso is always a hit with the kids.  I especially like doing self portraits in his style as it allows the students to be a bit more open without the inevitable "I don't know how to draw....or I'm just not good at this" type comments. (Seems to hit at Grade 4)

I have 2 methods to show you.

When describing the portrait I ask the students to see how he represents both the head on view and the side view together. I know that is a bit of a simplistic interpretation but all of a sudden I have kids really trying to interpret his paintings.....great to watch unfold.


MATERIALS REQUIRED:

- watercolor paper or heavy sketch/drawing paper
- pencil, eraser
- access to mirrors or use the partner method
- tempera disk paint
- sharpies or markers
- mounting paper

PROCEDURE:

To start get the students to draw an oval face with a neck and shoulders.  Head on view.

Now if they have access to mirrors (class set of Dollar Store hand mirrors works well), have them draw a line down the center of the oval,  (can be off kilter for a different look).
This will include the side view so they have to include some profile features like the nose in this line.


Now if you don't have access to mirrors a simple solution is to have the students working in pairs sketching their neighbor.
Now that the sketch is done it's time to paint.  You can use realistic color choices or to add some drama unusual colors.  (I usually go on here about how unusual colors signify dreams, visions, etc. in art)


Paint in all your sections.  In my sample I've kept the colors of the side view different from the heads on view...it's up to you.


Finally to give our portrait some "pop" I take my trusty sharpies and use black and silver to outline my portrait.


Mount onto a contrasting color and you're done.


My friend and colleague, Kim McCllough, recently did this lesson with her Grade 5s.  They used pastel instead of paint.


Terrific work everyone!


METHOD 2
The second portrait is a cut up face.


MATERIALS REQUIRED:

- colored paper, or white drawing paper
- paper for mounting
- pencil and eraser
- paint, markers, pastels or pencil crayon
- scissors
- glue

PROCEDURE:


Take your colored paper or plain white and sketch out a self portrait.  Use hand mirrors or the "sketch your neighbor" method.

You can do a head on or profile view.


Now add some color.  Here I'm using colored paper so I'm only adding lines with black, grey and white.  Incidentally I'm trying to keep to my value scale here. (good to do with older students)

Black lines are in shadow, white are highlights and grey middle value.


Now take those scissors and cut up your face.  You want pieces around 2 inches (5 cm) or so.  Try to keep some of the identifiable pieces intact, i.e. eyes, nose, mouth.


Take your mounting paper,arrange the cut up pieces and then glue into place.  Remind the students that this is not a puzzle, the pieces should be out of synch.


That's it.

A interesting study you could do with your students is to do both methods and then display both side by side.


For additional Picasso study be sure to check out my previous post on an "Mask Study".


See you soon.

Friday, February 17, 2012

How to Make an Acrostic Book

In the fall at ECEC I presented this acrostic book idea.  I've been getting requests for the "how to" so here we go.


Now Grade 1 did these BEAR books in November and just recently

Grade 3 made these ARCTIC books.


MATERIALS REQUIRED:

- posterboard or manila tag
- die cut machine, circut, or just your trusty scissors
- colored paper
- stapler, jump rings, string, or whatever you want as the binding material
- glue
- paint, text, poems, schoolwork to fill in the pages

PROCEDURE:

Decide on a word for your book.  This ARCTIC book, 6 letters is about as long as I would go.

I pre cut the letters on the circut machine.  I have also used the manual die cut at the school, and with older grades had them cut the letters themselves using stencils or the old "create a letter from a rectangle" method.  For those of you who don't have access to a diecut machine check out your local scrapbooking store.  Often they will allow you to use their die cutting equipment for a small charge.


Once you have your letters, I'm using 4 inch, cut some strips of posterboard, manila tag, or heavy paper.  I cut the strips 4 inches wide and used the actual width of the original paper as my length.

Place the letters down on one full strip and mark it to determine the length that each page should be.

Cut your pages.

For Grade 3 I pre stapled, you could also work on them loose and bind them at the end.

The students were given the letters one at a time and then asked to glue them on the end of the pages.

We used tacky glue as the glue sticks just don't seem to be sticky anymore. (Don't get me started.....)


So it should look something like this now.


It's a good idea to mark in pencil where each page lies on the next page.  This will help you keep your content from going to far and peeking out.


Now you can fill in those pages.  Grade 3 wrote a report on the "ARCTIC" using the letter featured for each page. For example for A, A Polar Bear crosses the tundra, An igloo is a house made of ice and snow.

Grade 1 wrote words applicable to BEAR on each page, like B is brown, black, big, bushy etc.
My sample book had paintings (of course) and then words based on the letters.

A: awesome
R: rugged
C: cold
T: tundra
I: icy
C: climate


You get the idea.
Why not give it a try.
Here is some recent student work to show you.  Here are a few file folder books.
and the picture stretching from grade 3.  Great job everyone.   I hope everyone has a good Teacher's Convention and enjoys the long weekend.

See you soon.