Wednesday, March 28, 2012

Easy Easter Art Project

I had honestly thought I posted this project years ago....oh well this one's for you Kim!  (you'll notice a theme here with the last post)


I have been immersed in Pysanky classes for about 2 weeks now.  Usually not all students will finish at the same time.  You have your ones who race to the finish, those who try to take as much time as they can, and then everyone in between.

As the kids finish their Pysanky egg they then can complete this pastel resist paper egg.

You then have a nice display for your bulletin board.


This is Grade 1.


MATERIALS REQUIRED:

- white paper, use heavy sketch or wc
- pencil and eraser
- oil pastels
- disk tempera paint
- scissors

PROCEDURE:
Draw a large egg shape on your paper.  For the younger grades you can provide them with a template.


Sketch out your own Pysanky design in pencil.  You want fairly large shapes.


Use the oil pastels to add some color to your egg.  Bright colors show up best including white.


Keep some areas of the egg uncolored.


You can also outline the egg shape.


Using watery disk tempera (a wash) paint over the entire egg.  The pastel areas will resist the paint.


When dry cut the egg out.


That's it.  Before you know it you'll have dozens of decorated eggs.


Here are some pictures of our Pysanky in process.


This is Grade 2.


Here are the Grade 3 eggs waiting for the wax to be taken off.


And even though I'm teaching Pysanky all day long I come home and work on my own eggs with my kids as well.
I'll have some completed Pysanky pictures for you Friday.  In the meantime why not do a large pastel resist paper egg!

See you soon.

Sunday, March 25, 2012

Carved Emu Eggs: Using Pastel Resist

In Australia "Kalti Paarti", or carved emu eggs became popular with both aboriginal and non aboriginal artists in the mid 19th century.


This is an egg from the Australian Museum depicting a moth.  The yolk has been blown out and the surface carved away to reveal the artist's design.

Easter time is a good time to introduce this art form to kids (lots of egg dye available) but we will be using pastel resist.


MATERIALS REQUIRED:

- eggs
- Easter egg dye
- oil pastels,and/or twistable crayons
- reference photos and material of aboriginal designs
- pencil
- paper towel

PROCEDURE:
To start you can pencil in your design on your egg.  I always leave the egg raw.  The inside will slowly evaporate over time.  Blown eggs are too fragile for the kids and hard boiled ones will rot.  We will not be eating these eggs.  You will be applying pastel or crayon to the areas you want to resist the egg dye.

Bright colors work best and although it's hard to see on the white egg, white pastel makes for a very striking design.


Dip egg into Easter egg dye.  I'm using the egg dye I use for Pysanky.  I choose black for a traditional look. 


Leave in the dye until the egg turns to the color you desire.  Lift out and blot with a paper towel.

Pastel resist eggs always turn out very striking.

Here is a set by Kindergarten.


Another activity you may want to try is doing a pastel resist on paper.  You will be able to add more detail on a larger egg shape.  A display of both art projects together (real egg and paper egg) would make for a very comprehensive display.

Draw egg shapes on heavy or wc paper.  Draw and color in design using pastels and /or twistable crayons.  Paint over egg shape with a wash (diluted disk tempera or watercolor).
Cut egg shapes out.


STUDENT WORK:

As promised I want to show you some of the student work from my recent "artist in residence".


These are tunnel books by Grade 6, based on selected stories they are currently reading.  I will be posting a "how to" on tunnel books shortly.


Grade 6 also did a mixed media canvas based on the title character of their selected novel.
Rainbow Fish by Kindergarten.


I'll have more student work for you next time, but why not try an egg......
See you soon.

Sunday, March 18, 2012

Peru Mixed Media Canvas

So my current "Artist in Residence" program is ending but I wanted to show you the Mixed Media that Grade 3 completed.

Peru is part of the social studies curriculum so we made these canvases.


MATERIALS REQUIRED:

- pre primed canvas (on sale this week at Michael's in the 10 pack) or you can use a piece of cardboard
- acrylic paint
- art shirts or smocks to protect student's clothes from acrylic paint
- pieces of sponge
- pieces of corrugated cardboard
- drywall compound
- plain paper
- reference photos of Machu Picchu
- watercolor or tempura paints
- llama pictures
- text printed from computer, (PERU, INCA, or Machu Picchu)
- Aleene's Tacky glue
- scissors
- Mod Podge, optional 

PROCEDURE:
Hand out some reference photos of Machu Picchu to the students.

Hand out canvas or cardboard substrate (background or base).

Hand out extra pieces of corrugated cardboard.  Have the kids line up a corner of the cardboard with the canvas.  Trace out a mountain ridge in pencil and then cut out of cardboard.

Place canvas aside.
Place a little drywall compound on a recycled plate.

Add some texture to the tops of the mountains.  This is not to represent snow but to add that 3D texture to appear rocky.


Let dry, about 4 - 6 hrs.


Cut a piece of paper to fit into the bottom part of your cardboard mountain.  Now Machu Picchu is a fairly complicated ruin for Grade 3 so I had them draw out a portion of the ruin on the paper.


Add some color to your design with watercolor or tempera disk.

Add some outlines with fine sharpie.


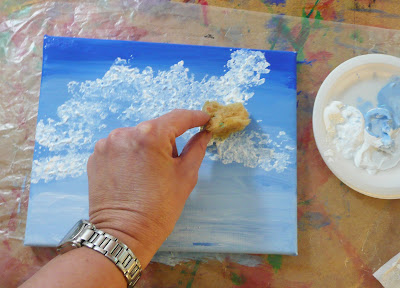
Put on those art shirts to protect your clothes from the acrylic paint.  Paint your canvas with sky colors.  Make sure to paint the sides as well as we won't be framing these.  Add some clouds or mist with white paint and a sponge.  Let dry.
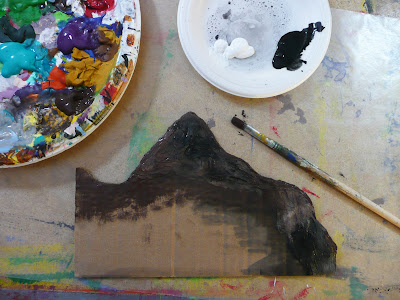
Paint your mountain.  You don't need to paint the bottom section where your paper design of the Machu Picchu ruin will be .  Let dry.


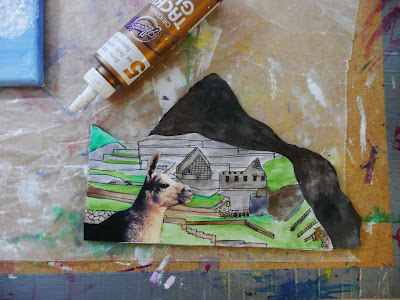
When I was researching this project it seemed like every time a tourist at Machuu Pichuu was trying to get a good picture of the site a llama would come up and stick their head into the shot, (probably looking for food), so I added this element.  Find a picture of a llama, there are lots on the web, and cut out the shape. Glue the design of the ruin to the bottom part of your mountain and then glue your llama into place.
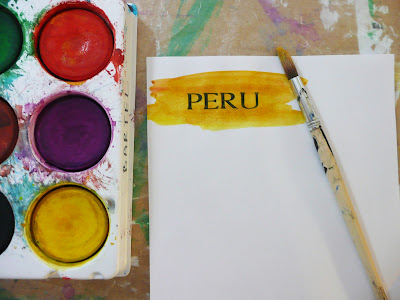
Glue the mountain piece onto the background with more tacky glue or a glue gun, (adults only).    Now we need a title.  You can either print off an assortment of titles for your students, have them do it during computer time, or have them free hand it.  Paint the paper with watercolor or tempera disk to give it some color.  Cut out and glue into place on your piece.

Finally you can add a protective coat of Mod Podge if you wish.

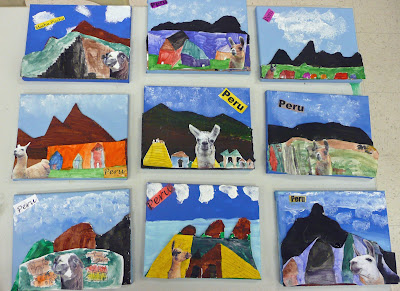
Here are some of the completed canvases that the Grade 3's made.  (By the way Mrs. K at my home school, I plan on doing these when I get back!)
I'm planning a post of the completed student work for next time and I'm teaching pysanky like crazy over the next two weeks.  (my hands are already multi colored from all the egg dying!).  See you soon.

Sunday, March 11, 2012

Nautical Canvas

As part of the "artist in residence" program I'm currently conducting each class is completing a canvas piece.

This is the Grade 2 project.  They are currently studying water, learning about buoyancy, why boats float, types of boats, etc.


MATERIALS REQUIRED:

- pre primed canvas, I buy the Michael's Value 10 packs when on sale, you can also use cardboard
- drywall compound, I bought a large bucket for $20 and the whole school has used it
- spatulas, old gift cards, plastic knives, or even rectangles of cardboard for spreading
- wax paper
- cardboard scraps
- scissors
- paint
- Aleene's Tacky glue or a glue gun (to be used by an adult)
- string
- colored tape
- Mod podge for sealing, optional

PROCEDURE:
Take the cardboard scraps and cut out a hull (boat) shape.  Depending on the style of boat you are making you can add sails, cabins, exhaust pipes, paddle wheels, etc.

Place on top of your canvas or cardboard to make sure it fits.


Set shapes aside for now.


Take a little bit of drywall compound and put on a recycled plate. Place your canvas on top of wax paper.

Spread the compound on the bottom 3rd of the canvas making wave patterns.

Set aside to dry.


Take the remaining compound and spread a layer on top of your shapes.


Using a skewer or toothpick you can etch in some designs for your boat.


Leave shapes to dry.


When the drywall compound has dried (about 6 hrs or so) you can start painting your pieces.

Paint your canvas background. 


Then paint your boat shapes.

Add details.


When the canvas and the boat pieces are dry glue into place with either Tacky glue or a glue gun.


You can add some string for rigging.  Just glue into place tucking the ends under the boat shapes.


Add little flags with colored tape.


Finally you can seal the whole thing with some Mod Podge for a nice shiny coat.


I hope to show you some student results shortly.


 That's it.


See you soon.